Last updated: August 23, 2026
You are two models into an evening and you have wiped the needle four times. The spray thins out, goes off center, then throws a speck onto the cloak you just blended. Wipe the tip, spray again, get two minutes of good work, repeat. It is not a breakdown, it is a slow tax on every session, and it makes detail work feel impossible.
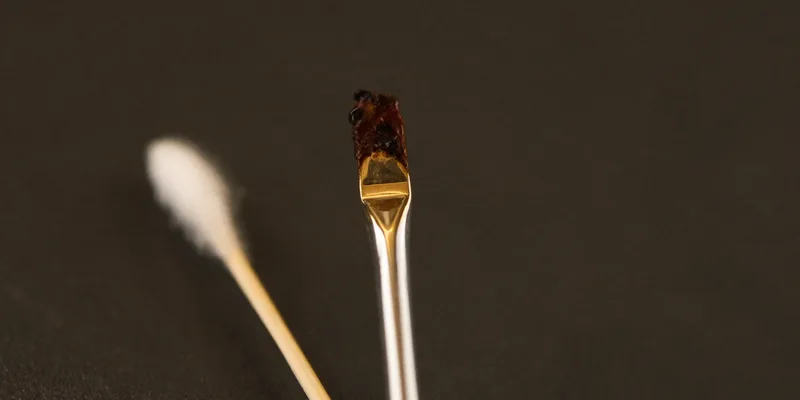
Tip dry is paint curing on the exposed tip of the needle while you are still using the brush. It is the single most common complaint in miniature airbrushing, it appears in reviews of cheap and expensive brushes alike, and almost every cause sits in your paint and your air rather than in the tool.
This article contains affiliate links. If you buy through them, we may earn a commission at no extra cost to you. Learn more.
Quick Answer
How do you stop tip dry on an airbrush?
- Thin the paint a little further first. Thick paint dries on the tip fastest.
- Raise the pressure slightly. Low pressure leaves paint sitting at the tip.
- Wipe with a damp cotton bud, pulling away from the tip, never towards it.
- Only then add a retarder, and add less of it than you think.
Bottom line: tip dry is a consistency and airflow problem. A retarder helps, but it is the fourth thing to try, not the first.
What Tip Dry Actually Is
A thin film of paint curing on the very end of the needle where it sits in the nozzle opening. That tiny bit of paint is exposed to moving air, spread thin, and warmed slightly by the airflow, so it dries far faster than the same paint would in the cup. Once it hardens, it deflects the spray.
That is why the symptom is a spray pattern that drifts off center or splits, rather than a total blockage. The passage is still open. The shape of the opening has changed, and paint is now leaving it at an angle.
The Free Fixes, in Order
Work through these before adding anything to the paint, because each one costs nothing and any of them may be the whole answer. Change one thing at a time and spray a test card between changes, otherwise you learn nothing about your own setup.
Thin the paint further first. Raise the pressure a step. Wipe the tip properly rather than picking at it. Reduce the amount of trigger travel you are using, since spraying at a hair of trigger keeps paint creeping at the tip. Check the crown cap for a build up of dried paint that traps more paint. Finally, look at the room: a warm dry space dries everything faster.
Wipe Without Bending the Needle
Use a damp cotton bud and pull it away from the tip along the direction the needle points, or twist it gently around the needle. Never push a hard object into the crown, and never wipe back towards the body while pressing sideways. That is how needles get the small hook that ruins the spray permanently, which our bent airbrush needle guide covers.
Why Thin Paint and Higher Pressure Help
Thin paint carries more fluid per unit of pigment, so the film at the tip stays wet longer and gets carried away by the next pass instead of setting. Higher pressure moves that film off the needle before it can cure. Between them these two account for most tip dry cases that people blame on the brush.
Reviewers who hit heavy tip dry and splatter on a Gaahleri brush described solving it by raising the thinning ratio and running the pressure above thirty PSI rather than by changing tools. That is the standard shape of the fix, and it applies across brands.
There Is a Limit in Both Directions
Push the pressure too high and you get overspray, a rough finish and paint bouncing off the model. Thin too far and you get runs, pooling and a coat that will not cover. Tip dry sits in a window, and finding your own window on a test card takes about five minutes once, then serves you for years.
When a Retarder Earns Its Place
A retarder slows the curing of acrylic paint, which is exactly the mechanism behind tip dry. If you have thinned properly, set a sensible pressure and still cannot get through a session without wiping, this is the product that solves it rather than a workaround.
Use it sparingly. Too much retarder gives you a coat that stays tacky, picks up dust, and lifts when you mask over it. A few drops into a cup of thinned paint is the usual scale, and the manufacturer’s own guidance on the bottle is a better starting point than a ratio from a forum.

Flow Improver Is Not the Same Thing
Flow improver reduces surface tension so paint spreads and moves through the brush more easily. It helps with tip dry as a side effect, because paint that flows better leaves less of a film behind, but it is not a drying retarder and it does not extend working time the same way.
Vallejo sells the two as separate products in its airbrush range for that reason. Many painters run a little flow improver in everything and reach for a retarder only in a warm room or on a long session. Our guide to flow improver and retarder covers when each one is the right call.

Nozzle Size and the Paint You Are Using
A smaller nozzle dries at the tip sooner, because there is less paint moving through a smaller opening and the film at the edge is thinner. If you do most of your work with a fine detail nozzle out of habit rather than need, going up a size for basecoats removes a lot of wiping.
| Setting or choice | Effect on tip dry | Cost of overdoing it | Try when |
|---|---|---|---|
| Thinner paint | Strong improvement | Runs, weak coverage | Always the first change |
| Higher pressure | Strong improvement | Overspray, rough finish | Basecoats and priming |
| Retarder | Direct fix, slows curing | Tacky coat, dust pickup | Warm room, long sessions |
| Larger nozzle | Noticeable improvement | Loses fine line control | Coverage work, primer |
Paint Ranges Behave Differently
Some ranges are formulated to dry fast on the model, which is a virtue when you are layering and a nuisance at the needle. Matte finishes and heavily pigmented colors tend to be the worst offenders, and metallics sit somewhere in between because the flake changes how the film sits.
If one specific bottle is dramatically worse than the rest of your rack, the paint is the variable and not your technique. Thin that color further, add a drop of retarder to it specifically, and see whether it comes back into line. Our guide to airbrush paint for miniatures covers which ranges arrive closer to airbrush ready.
Frequently Asked Questions
Why does paint dry on the tip of my airbrush so fast? Because the film there is thin, exposed and moving through air. Thick paint, low pressure and a warm dry room all accelerate it. Thin the paint, raise the pressure a step and see how far that gets you before buying anything.
Is tip dry a sign of a cheap airbrush? No. It happens on premium brushes too, and reviews of expensive models mention it. Build quality affects how easily you can clear it and how well the needle survives repeated wiping, not whether paint dries at the tip in the first place.
Can I just wipe the tip with my finger? You can, and plenty of people do, but a fingertip pushes sideways on a fine needle and that is how hooks start. A damp cotton bud pulled away from the tip does the same job without loading the needle sideways.
How much retarder should I add? Less than feels useful, then test. A few drops into a cup of thinned paint is the usual scale, and the label on the bottle is a better guide than a ratio from a forum. Too much leaves the coat tacky for a long time and it will pick up dust.
Does tip dry mean my airbrush needs cleaning? Not necessarily, but a crown cap crusted with old paint gives fresh paint something to catch on, so it makes the problem worse. Clearing the cap and the nozzle exterior between colors helps, which our nozzle cleaning guide covers.
The Bottom Line
Thin the paint, raise the pressure a step, wipe the tip away from the needle rather than at it, and only then reach for a retarder. Most sessions that involve constant wiping are running paint that is slightly too thick at slightly too low a pressure, and both are free to change. Keep the retarder for warm rooms and long detail sessions, where it genuinely solves what technique cannot. Read next: thinning acrylic paint for airbrush for the consistency to aim for, and airbrush thinner for what to thin it with.