Last updated: August 23, 2026
The airbrush was fine last week. Tonight it puts out a weak, uneven spray that fans off to one side, and no amount of flushing changes it. You already know where the problem is, because it is always the same place: a hole narrower than a human hair with something dried inside it.
What happens next decides whether you have a five minute job or a replacement part on order. Nozzles are the most fragile component in the tool and the one people damage while trying to fix, usually by applying force to something that only ever responds to patience. This is the careful sequence, in the order that stops most people needing the later steps at all.
This article contains affiliate links. If you buy through them, we may earn a commission at no extra cost to you. Learn more.
Quick Answer
How do you clean a blocked airbrush nozzle?
- Backflush first, then pull the needle and wipe it. Half of all blockages clear right there, for free.
- If it persists, remove the nozzle and soak it in cleaner. Time does the work, not force.
- Brush the outside and the bore with a soft brush. Only then consider a reamer, gently.
- Never push a needle or a wire hard into a nozzle, and never lever it with a tool.
Bottom line: soak, brush, ream, in that order, and stop as soon as it clears. Every damaged nozzle is a step done out of sequence.
Why the Nozzle Is Where Everything Goes Wrong
Because it is the smallest opening in the system and everything passes through it. A 0.3mm nozzle has an aperture narrower than the head of a pin, and it sits in a stream of warm moving air that dries paint faster than anywhere else in the tool. Any particle larger than the gap stops there.
It is also thin walled metal, often with a fine thread, and in some designs it is a soft alloy that deforms rather than resists. That combination of critical and delicate is why manufacturers describe hand tight as the correct torque, and why the most common repair bill in this hobby is a nozzle somebody over tightened.
Free Fixes to Try Before You Touch It
Backflush the brush with cleaner two or three times, blocking the cap so the fluid agitates the whole channel. Then pull the needle out, wipe it clean from the middle towards the tip, and slide it back. A surprising proportion of blockages are paint on the needle rather than in the nozzle, and both of these cost nothing.
If that does not do it, drop the pressure test: spray with the needle fully back and see whether anything comes through. A dribble means partial blockage, nothing at all means full blockage or a stuck needle. Either way you now know whether to keep flushing or move on to removal. Our guide to airbrush clogging covers the wider diagnosis.
Removing the Nozzle Without Damaging It
Pull the needle out first, always. A needle left in place while you unscrew a nozzle is how needles get bent and nozzles get cracked, because the two are wedged against each other. With the needle out, the nozzle comes free with almost no resistance if it was tightened correctly last time.
Use the wrench that came with the airbrush rather than a generic one, because the flats are small and a loose fitting tool rounds them off. If the nozzle will not turn, soak the front end in cleaner and try again later instead of applying more force. Nothing inside an airbrush is meant to need force.
Soak, Brush, Then Ream
Put the nozzle in a small container of cleaner and leave it for the time the bottle recommends. Solvent cleaners work faster on cured paint, water based cleaners work more gently, and either way the soak is doing work you cannot do mechanically without risk. This is the step people skip and then regret.
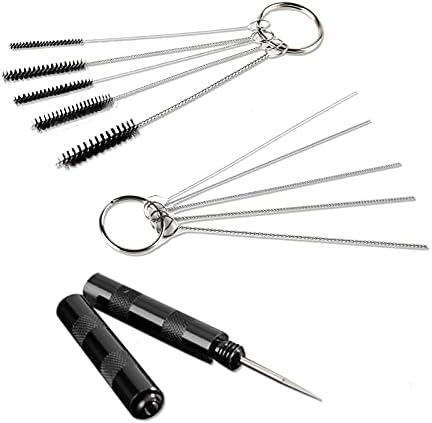
After the soak, work the outside and the bore with the smallest soft brush in your kit, then flush cleaner through and hold it to the light. If you can see through it, you are done. Only if the blockage survives soaking and brushing should a reamer come out, and then it goes in under its own weight with no push at all. Our airbrush cleaning kit guide covers the tools involved.
Tool Options for a Blocked Nozzle
Ranked from safest to riskiest, which is also the order you should try them in.
| Method | Risk to the nozzle | Clears | Notes |
|---|---|---|---|
| Soak in cleaner | None | Most cured paint | Follow the times on the bottle |
| Soft brush | Very low | Softened residue | Outside and bore |
| Ultrasonic bath | Low | Deep residue | Watch plating and soft alloys |
| Reamer or fine wire | High if pushed | Stubborn plugs | No force, ever |
What a Cracked Nozzle Looks Like
Often like nothing at all. A hairline split in a nozzle is usually invisible to the naked eye and shows itself in behavior instead: bubbles rising in the cup while you spray, a spray that sputters no matter how clean everything is, or paint that leaks around the nozzle housing.
Those symptoms after a thorough clean mean the part rather than the paint. A magnifier helps, but the practical test is fitting a spare nozzle and seeing whether the problem disappears. Anyone who paints regularly should own a spare, because this is a consumable rather than a permanent component. Our sputtering guide works through the other causes first.

Self Centering and Threaded Nozzles
Two designs, and they want different handling. A threaded nozzle screws into the body and needs a wrench, light torque and a clean thread. A self centering or push fit nozzle, common on several European brushes, drops in and is held by the head, which makes it far harder to over tighten and easier to clean.
If you are constantly fighting your nozzle, the design is worth knowing about before your next purchase, because it genuinely changes maintenance. Our needles and nozzles guide covers which brands use which system and how the sizes compare.
Putting It Back Without Overtightening
Finger tight, then the smallest possible nudge with the wrench. That is the whole instruction. The nozzle seals against a seat, not against thread tension, so extra torque adds nothing except the risk of splitting the part. Every manufacturer says a version of this and every forum has someone who learned it the expensive way.
Then slide the needle back in slowly until it seats, without pushing it home. A needle driven into a nozzle with force is the other half of the same problem, and the two failures are hard to tell apart afterwards. Gentle in both directions, and the nozzle lasts years.
Frequently Asked Questions
Can I use a needle or a wire to clear a nozzle? Only with no force, and only after soaking has failed. The correct tool is a reamer sized for the nozzle, allowed to find the hole under its own weight. Anything pushed into that opening can enlarge it permanently, which changes the spray pattern and cannot be reversed.
How often should I remove the nozzle? Roughly weekly if you paint often, or after any session where paint dried in the brush. It is not part of the end of session routine for most people, because the needle comes out and the flush handles the rest. Remove it when there is a reason, not on a schedule.
Why does my airbrush spray to one side? Usually dried paint on one side of the nozzle opening or a bent needle tip. Clean the nozzle first, then inspect the needle under a magnifier by rolling it on a flat surface. A hooked tip is easy to see that way and is a common result of wiping the needle backwards over the taper.
Can I clean a nozzle in an ultrasonic cleaner? Yes, and it works well on deep residue. Watch out for plated parts and soft alloys with long cycles, and use the fluid the airbrush maker recommends rather than an aggressive descaler. Our ultrasonic cleaner guide covers when it is worth the bench space.
How do I know if the nozzle is worn out rather than dirty? If a full clean restores the spray, it was dirty. If bubbles appear in the cup, the spray sputters after cleaning, or paint leaks around the housing, suspect a crack or a worn seat and fit a spare to confirm. Nozzles are consumables and replacing one is routine.
The Bottom Line
Backflush and wipe the needle before you take anything apart, then soak, brush and only reluctantly ream. Remove the needle before the nozzle, use the maker’s wrench, and put it back finger tight because the seal is at the seat rather than in the thread. Keep a spare nozzle in the drawer so a cracked one costs an evening rather than a week. Read next: the full cleaning routine and our airbrush cleaner comparison.