Last updated: August 23, 2026
You are five minutes into basecoating a squad and the spray has already gone patchy. You pull the needle back further, nothing much happens, and when you look at the crown cap there is a little crust of dried paint sitting on the tip. Wipe it, spray again, five more minutes, same crust. That is tip dry, and it is the single most common reason people decide airbrushing is not worth the trouble.
Somewhere in that frustration you end up on a hobby shop page looking at two small bottles that both promise to help: flow improver and retarder. They are not the same thing, they do not fix the same fault, and adding the wrong one in the wrong amount makes the spray worse rather than better. Here is what each one actually changes.
This article contains affiliate links. If you buy through them, we may earn a commission at no extra cost to you. Learn more.
Quick Answer
Do you need a flow improver or a retarder for airbrush acrylics?
- Flow improver breaks surface tension so paint atomizes and levels better. Reach for it first.
- Retarder slows drying. It is the stronger answer to tip dry, and the easier one to overdo.
- Neither is a thinner. They change behavior, not consistency, so you still need thinner or the right paint.
- Both are measured in drops, not splashes. A couple of drops per cup is the normal working amount.
Bottom line: fix your thinning ratio and your pressure first, then add flow improver, and keep retarder in reserve for hot, dry rooms and long sessions.
What These Two Bottles Actually Do
Flow improver reduces the surface tension of acrylic paint so it breaks into finer droplets and settles into a smoother film. Retarder slows the rate at which the water and solvent leave the paint, keeping it wet for longer. One changes how the paint moves, the other changes how fast it stops moving.
That distinction matters because they solve different halves of the same complaint. Paint that sprays coarse and beads on the surface wants flow improver. Paint that dries on the needle before it reaches the model wants retarder. Plenty of painters own both and use them for different jobs, which is the sensible outcome rather than a sign of overspending.
Why They Are Sold as Mediums, Not Thinners
A medium is an additive that changes a property of the paint without being the main carrier. Thinner is the carrier. You can add a few drops of medium to paint that is already correctly thinned, but you cannot use medium instead of thinner and expect the mix to spray. That mistake accounts for a lot of the disappointed reviews on both products.
Tip Dry Is the Problem Both of Them Claim to Solve
Tip dry is paint drying on the outside of the needle at the nozzle opening, where a thin film of paint meets moving air. The air is doing exactly what it is supposed to do, which is evaporate the carrier. It just does it in the wrong place, right at the tip, and the crust that forms deflects the spray.
Modern hobby acrylics dry fast on purpose, because painters want to handle a model again quickly. That same quality is what puts a crust on your crown cap. So the fault is not really a defect in the paint, and it is not usually a defect in the airbrush either. It is a mismatch between drying speed, air pressure and the room you are working in. We go through the whole diagnosis in our guide to airbrush tip dry.
Flow Improver: What It Changes
Flow improver lowers surface tension, which does three visible things: the paint atomizes into finer droplets, it levels out instead of holding brush-like ridges, and it clings less stubbornly to the needle. It also slightly slows drying as a side effect, which is why it helps with tip dry without being a dedicated retarder.
Vallejo’s own product information for Airbrush Flow Improver 71.462 recommends one to two drops of the medium to ten drops of paint in the cup, which is a useful anchor for any brand. Start at the low end. Flow improver is the additive most people can use routinely without thinking hard about it, and on smooth surfaces like a gunpla shell it makes a visible difference to how the coat lays down.

Retarder: What It Changes
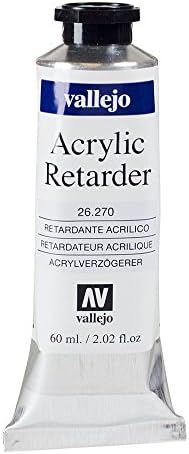
Retarder does one job and does it strongly: it keeps the paint wet for longer. That is the direct counter to tip dry, and it is also what lets you spray in a warm, dry room without the paint half drying in the air before it lands. It buys you working time at the tip and a wetter coat on the model.
The cost is that everything downstream also stays wet longer. Masking too soon lifts the coat, a second pass can disturb the first, and a heavy hand with retarder leaves a film that stays tacky far longer than you expect. Vallejo Retarder Medium and the equivalents from other acrylic makers are all designed to be dosed in drops, not poured, and the failure mode of too much is always the same sticky finish.
Flow Improver or Retarder at a Glance
The quickest way to choose is to name the symptom you actually have, then pick the medium that addresses it. Where both apply, flow improver is the lower risk starting point because it is harder to ruin a coat with it.
| Additive | What it changes | Use it when | Risk if overdone |
|---|---|---|---|
| Flow improver | Lowers surface tension, finer atomization | Coarse spray, beading, orange peel texture | Coat gets translucent and slow to build |
| Retarder | Slows drying of the paint film | Tip dry within minutes, warm dry room | Tacky finish, masking lifts the coat |
| Thinner | Changes consistency only | Paint too thick to atomize at all | Runs, pooling, loss of coverage |
| Water | Dilutes without supporting the binder | Emergency only, in small amounts | Paint separates, pigment clumps in the cup |
How Much Is Too Much
The honest working rule is that mediums are measured in single drops added to a cup you have already mixed. Two drops of flow improver into a cup of thinned paint is a normal dose. Retarder is stronger and one drop is often enough. If you can see the medium changing the color or the opacity of the mix, you have gone too far.
Overdosing shows up in predictable ways. Too much flow improver and the paint goes thin and glazy, so you spray five passes to get the coverage of two. Too much retarder and the surface stays soft under a fingernail long after you expected it to be handled. Neither ruins the model permanently, but both waste a session.
What to Try Before You Add Anything
Mediums are not the first move. Tip dry very often comes from paint that is too thick, pressure that is too low, or a nozzle that is smaller than the paint deserves. All three are free to change and all three are more likely to be the real cause than a missing bottle of retarder.
Work through it in order. Thin the paint properly until it moves like milk in the cup, raise the pressure a little and watch whether the crust stops forming, and check that you are not spraying a heavily pigmented color through a very fine nozzle. Our guide to thinning acrylic paint for airbrush covers the ratios, and airbrush nozzle size covers the match between paint and opening.
Matching the Medium to the Paint
Acrylic makers formulate their mediums to sit inside their own system, and the safest combination is a brand’s medium with that brand’s paint. Cross-brand mixing usually works, because most hobby acrylics are water based and chemically similar, but it is where the odd curdled cup comes from.
Vallejo’s flow improver and retarder are the default pairing for Model Air and Game Air, and they are the ones most likely to be sitting on a hobby shop shelf next to the paint. Artist-grade alternatives from acrylic paint makers work too and come in larger bottles, which is worth knowing if you spray a lot of primer or a lot of one color. For the paint side of that decision, see our airbrush paint guide.

The Case for Owning Both
They cover different seasons as much as different problems. In a cool, damp room in the winter, paint stays wet on its own and flow improver alone smooths out the coat. In a warm room in July, with a window open and dry air moving past the tip, retarder is the thing that keeps you from wiping the needle every other model.
Both bottles last a long time because you are using drops, so the pair is a cheap addition to a paint order rather than a real purchase decision.

Frequently Asked Questions
Why does paint dry on the tip of my airbrush? Because a thin film of paint sits at the nozzle opening in moving air, which is close to ideal drying conditions. Thicker paint, low pressure and a warm dry room all make it faster. Retarder is the direct chemical answer, but thinning correctly and raising pressure slightly often fixes it without any additive.
Can I use flow improver instead of thinner? No. Flow improver changes surface tension, not consistency, so paint that is too thick stays too thick. Thin first with the proper thinner, get the mix moving like milk, then add a drop or two of flow improver to the cup if the spray still looks coarse.
Is retarder the same as flow improver? No, though the effects overlap. Retarder slows drying, flow improver reduces surface tension and only slows drying slightly as a side effect. If your problem is a crust on the needle, retarder is stronger. If your problem is texture and coarse spray, flow improver is the right bottle.
Does flow improver work with Citadel or Tamiya paint? With Citadel Air and other water based acrylics, yes, the chemistry is close enough. Tamiya acrylics are alcohol based and behave differently, so Tamiya’s own X-20A is the safer route there. Our Tamiya airbrush paint guide explains why that line is its own case.
The Bottom Line
Flow improver is the everyday additive and the one to buy first, because it smooths the coat and slightly slows drying without much risk of overdoing it. Retarder is the specialist, kept for warm rooms and long sessions where the tip crusts over every few minutes, and it is dosed one drop at a time. Neither replaces correct thinning, so start there. Read next: how to thin acrylic paint for airbrushing and choosing an airbrush thinner.