Last updated: August 23, 2026
The first session almost always goes the same way. More paint ends up on the towel than on the model, the first stroke leaves a blob, and somewhere around the twenty minute mark the brush stops spraying properly and you are not sure why. Everyone starts there.
Almost all of it comes down to four habits: thin the paint, set the pressure deliberately, get the trigger sequence right, and clean before anything dries. This is the walkthrough for a first session that ends with a working airbrush and a primed model rather than a clogged brush in a saucer.
This article contains affiliate links. If you buy through them, we may earn a commission at no extra cost to you. Learn more.
Quick Answer
How do you use an airbrush for the first time?
- Thin the paint to roughly the consistency of milk before it goes anywhere near the cup.
- Set the regulator low, spray a test card, and raise the pressure only if the paint spatters.
- Trigger sequence: air on, paint in, paint off, air off. Never start or stop with paint flowing.
- Flush the cup and backflush between colors, and strip the brush before you leave the table.
Bottom line: spend the first hour on paper, not on a model, and the second hour will go far better.
Set Up the Table Before You Mix Anything
Put a towel down, set the compressor where the hose reaches without dragging, and keep cleaner, thinner and a cleaning pot within arm’s reach. Have a window open or a booth running, because overspray goes somewhere and that somewhere is the room. Check the paint you are using and follow the ventilation guidance on the manufacturer safety data sheet.
The other setup item is a stack of scrap paper or plastic card. You want somewhere to test every mix before it touches a model, every time, not just today.
Where the Mist Actually Goes
Overspray that does not land on the model stays airborne and settles on everything nearby. A cleaning pot catches the flushing mist, and a booth or an open window handles the rest. Our ventilation page covers the options for a room that is also a dining room.

Thin the Paint First
Paint straight from the bottle is too thick to atomize through a hobby nozzle, even when the label says airbrush ready. The target most painters use is the consistency of milk: it should run off a stirrer in a thin continuous stream rather than dripping in blobs. Mix in the cup or in a separate pot, whichever you find tidier.
Thinner made for your paint line behaves better than water, because water dilutes the binder along with the pigment and encourages tip dry.
Test, Then Adjust
Spray a line on your test card. Grainy and dusty means too thick, too far away or too much pressure. Runs and spidering mean too thin, too close or too little pressure. Change one thing at a time. The detail is in our thinning walkthrough.

Set the Pressure Deliberately
Turn the regulator down before you start and work upward, rather than starting high and hoping. Low pressure gives you a soft, controlled coat and is where miniature work lives. Higher pressure atomizes thicker paint, covers faster, and is what you reach for with primer or when paint keeps drying at the tip.
Set the pressure while air is flowing, because a gauge reading with the trigger closed shows the stored pressure rather than the working pressure.
Pressure and Distance Work Together
Close to the surface at low pressure gives fine lines. Further back at higher pressure gives even coverage. Trying to get fine lines from a distance is the most common early mistake, and it produces a dusty, textured finish rather than a crisp one.
The Trigger Sequence
Press down for air before the brush is over the model. Draw back gently for paint once you are already moving. Ease the trigger forward to stop paint before the stroke ends. Release the air last. Every blob at the start of a pass and every splatter at the end comes from getting this order wrong.
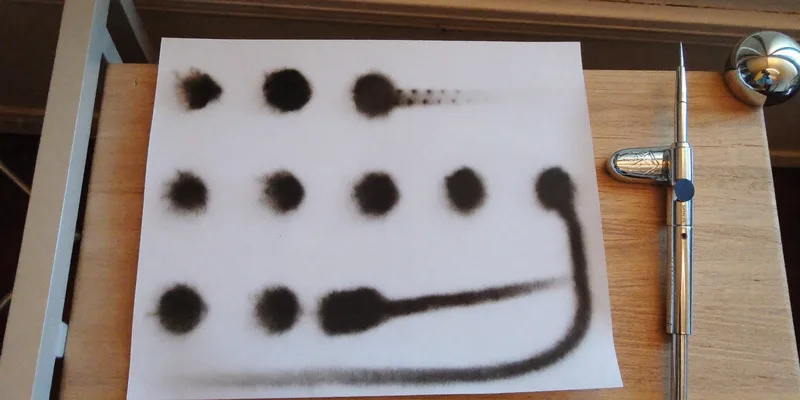
Practice it as a movement rather than a rule. Ten minutes of lines and dots on paper builds the habit faster than any amount of reading.
Three Practice Exercises
Draw parallel lines as thin as you can manage, keeping them even from end to end. Then a row of dots, easing paint in and out for each one. Then a fade from solid to nothing across the page. Those three cover almost every technique you will use on a model.
A First Session, Step by Step
The order below assumes you are priming and basecoating something rather than attempting detail work, which is the right first project by a wide margin. None of these steps takes long on its own, and the one people skip and later regret is the test card, because it is the only step that tells you whether the mix is right.
| Step | What you do | Watch for | If it goes wrong |
|---|---|---|---|
| 1. Set up | Towel, ventilation, cleaner within reach | Hose dragging the brush off the table | Use a holder |
| 2. Thin paint | To a milk like consistency | Lumps and skin from an old bottle | Strain or shake it properly |
| 3. Set pressure | Low, with air flowing | Reading the gauge with air off | Open the trigger and re read |
| 4. Test card | Line, dot, fade | Grain or spidering | Adjust one variable at a time |
| 5. Paint | Thin passes, keep moving | Pooling in recesses | Back off and build up slowly |
| 6. Clean | Flush, backflush, strip | Paint drying while you tidy | Clean before you put anything away |
If your first coat looks textured rather than smooth, that is almost always thinning or pressure rather than the airbrush.
Cleaning Before You Leave the Table
Between colors, empty the cup, wipe it out, fill with cleaner and backflush by covering the crown cap so cleaner is pushed back up the passage. Spray clean cleaner through until it runs clear. At the end of the session, strip the brush properly: needle out, nozzle off, passage cleaned, everything reassembled snug rather than tight.
Paint left to dry inside is the single biggest cause of a brush that never sprays properly again.

Handle the Needle Carefully
Always draw the needle out backward, never push it forward through the nozzle, and never force it. A bent needle tip is the most common self inflicted damage in this hobby. The full routine is in our cleaning guide.
Frequently Asked Questions
What pressure should a beginner use? Start low and raise it only when the paint refuses to atomize. Miniature work sits well below what most people guess. Rather than copying a number from a forum, find the setting where your particular paint sprays smoothly on a test card.
How far should I hold the airbrush from the model? Close for fine lines, further back for even coverage. A useful habit is to keep the distance constant through a stroke, because moving nearer mid pass is what causes a heavy patch in the middle.
Why does paint splatter at the start of every stroke? The trigger sequence. Starting paint before air, or starting the stroke already over the model, dumps a bead of paint. Get air moving first and begin the stroke off to the side.
My airbrush stops spraying after ten minutes. What is happening? Usually paint drying at the needle tip, which restricts the opening until nothing comes through. Thin properly, raise the pressure a little, and consider a retarder. Our page on tip dry covers it.
Can I leave paint in the cup between sessions? No. It dries in the passage and in the nozzle, and clearing that out is far more work than the two minutes cleaning would have taken. Empty and flush before you stand up.
How long does cleaning take? Under a minute for a color change and around ten minutes for a proper strip down. If it is taking much longer, paint is drying in the brush during the session rather than being flushed out.
The Bottom Line
Thin the paint to a milk like consistency, set the pressure low and deliberately, and learn the trigger sequence of air on, paint in, paint off, air off. Spend the first hour on paper doing lines, dots and fades, then prime something simple. Clean before you leave the table, every time, and handle the needle backward and gently. Read next: how to airbrush miniatures for the sequence from primer to glaze, and choosing an airbrush if you are still shopping.