Last updated: August 23, 2026
Almost everyone who gives up on airbrushing gives up at the sink. The painting part is fun, the cleaning part arrives when you are tired and want to put the kids to bed, and it is very easy to decide that a quick rinse will do. Two sessions later the trigger feels sticky, the spray fans off to one side, and the tool that was working perfectly is now a project.
The good news is that a proper clean is short if you do it while the paint is still wet. The long, unpleasant, cotton-bud-and-solvent cleans are all recovery work from paint that was allowed to cure inside the brush. Here is the routine that keeps you out of that situation.
This article contains affiliate links. If you buy through them, we may earn a commission at no extra cost to you. Learn more.
Quick Answer
How do you clean an airbrush properly?
- Between colors: dump the cup, flush with cleaner, backflush until it bubbles clear. Around two minutes.
- End of session: flush, then remove the needle and nozzle, wipe them, and clean the cup and channel.
- Backflushing means blocking the cap so air pushes cleaner back into the body. It reaches what flushing misses.
- Never force a nozzle and never soak a whole airbrush with the seals in it.
Bottom line: clean while the paint is wet and the job is small. Everything difficult about airbrush cleaning starts with dried paint.
The Two Cleans You Need
There is a color change clean and an end of session clean, and confusing them is why people either waste time or damage things. The color change clean is a flush that clears the cup and the channel so the next color is not contaminated. The end of session clean removes the paint that a flush cannot reach, before it has a chance to cure.
You do the first several times an evening and the second once. If you only ever do the first, residue builds behind the needle packing and in the nozzle threads until the brush needs a strip down. If you do the full version every color change, you will spend your whole hobby time cleaning and give up.
Between Colors: the Two Minute Flush
Tip the leftover paint back into the bottle or onto a paper towel, then wipe the cup out with a folded piece of towel wrapped around a cotton bud. Fill the cup with cleaner, spray it through into a pot or a towel, and repeat until what comes out is clear rather than tinted.
Then backflush once, refill, and spray again. That is the whole routine and it genuinely takes about as long as it took to read this. The single most useful habit is doing it immediately, while the paint left in the cup is still wet, rather than after you have admired the model for ten minutes.

What Backflushing Actually Does
Backflushing is blocking the crown cap or nozzle opening with a finger or a rag and pulling the trigger, so the air has nowhere to go except backwards into the cup. It pushes cleaner back through the paint channel and up into the cup, agitating the whole passage instead of just running liquid past it.
You know it is working when the cleaner in the cup bubbles vigorously. That agitation lifts pigment out of the channel behind the needle, which is the area a straight flush washes over without disturbing. Keep the pressure modest, because a hard backflush can push cleaner past the needle packing and out of places you did not intend.
Do Not Backflush a Full Cup
Half a cup at most. A full cup under backflush pressure spits cleaner up and out, which is unpleasant if you are leaning over it and worse if you are using a solvent cleaner. This is the one part of the routine that catches everybody once.
End of Session: the Full Clean
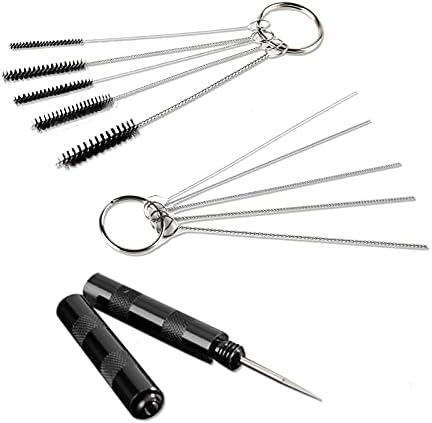
Start with the same flush, then take the brush apart far enough to touch the two parts that matter: the needle and the nozzle. Loosen the needle chuck at the back, slide the needle out gently forwards or backwards depending on your model, and wipe it from the middle towards the tip with a cleaner-damp cloth.
Wiping towards the tip matters. Wiping back over the taper is how needles pick up a hooked point, and a hooked needle sprays crooked forever after. With the needle out, run a cotton bud with cleaner around the cup and down into the channel, then put a drop of cleaner through the nozzle end before you reassemble.
How Far to Strip It Down
There are three sensible levels of disassembly and one that is usually a mistake. Match the level to what you are trying to fix rather than stripping to the frame every time.
| Level | What you remove | When | Main risk |
|---|---|---|---|
| Flush only | Nothing | Between similar colors | Slow buildup if it is all you do |
| Needle out | Needle and crown cap | End of every session | Hooking the tip while wiping |
| Nozzle out | Nozzle and needle | Weekly, or after a clog | Cracking or losing the nozzle |
| Full strip | Trigger, valve, seals | Rarely, for a real fault | Lost parts, damaged seals |
The Parts You Should Not Soak
Never drop a complete airbrush into a jar of cleaner. The rubber seals and any plastic components were not designed to sit in solvent, and a long soak swells them so the brush leaks air afterwards. This is one of the most common ways people damage a tool while trying to look after it.
Metal parts, needles and nozzles tolerate a short soak in the cleaner the manufacturer recommends, following the times on the bottle. Anything longer than that is an attempt to dissolve a problem that would be better solved mechanically, carefully, with a brush. Our nozzle cleaning guide covers the safe version of that.
Drying, Reassembly and the Needle
Let the parts dry before reassembly, or at least wipe them, because trapped cleaner behind the packing keeps working on the seals long after you have put the brush away. A few minutes on a paper towel is enough for the needle and nozzle.
When the needle goes back, slide it in slowly until it seats and then tighten the chuck gently. Pushing it home hard is how nozzles crack, and a cracked nozzle produces exactly the sputtering and bubbling that people misdiagnose as a compressor fault. Finger tight plus a touch is the standard advice from every manufacturer worth listening to.
Signs You Have Been Skipping Steps
A trigger that feels gritty, a spray that fans to one side, paint that only starts flowing after the needle is well back, or bubbles rising in the cup while you spray. All four are symptoms of accumulated residue rather than component failure, and all four usually clear with one thorough strip and clean.
If a full clean does not fix it, you are looking at a bent needle, a cracked nozzle or a perished seal instead, and those are parts rather than problems. Our sputtering guide separates the two, and the maintenance schedule sets out what to do weekly and yearly so you stop meeting them.

Frequently Asked Questions
How often should I deep clean my airbrush? Take the needle out at the end of every session, take the nozzle out roughly weekly if you paint often, and strip further only when something is actually wrong. A brush that gets a proper end of session clean rarely needs anything more dramatic.
Can I leave paint in the cup between sessions? No. Even a small amount left overnight dries into the channel and behind the needle, and the recovery job costs far more time than the flush would have. Tip it back into the bottle if it is still usable, then flush before you walk away from the bench.
What is backflushing and do I need to do it? Blocking the nozzle so air pushes cleaner back into the cup, agitating the paint channel. Yes, it is worth doing, because it reaches residue a straight flush passes over. Use half a cup, moderate pressure, and stop when the bubbling runs clear.
Should I use a cleaning pot? It is not essential but it contains the spray and stops you misting cleaner across the room. Anyone cleaning at a dining table rather than a dedicated bench will appreciate one. See our guide to the airbrush cleaning pot for the glass and plastic versions.
My airbrush still sputters after cleaning. What now? Check the nozzle for a crack and the needle for a hook, then check that the nozzle is seated and not over tightened. Those three account for most post-cleaning faults. If the brush also spits water, the cause is upstream in the air line rather than in the brush at all.
The Bottom Line
Flush between colors, take the needle out at the end of the night, wipe it towards the tip, and never leave paint sitting in the cup. That is ninety percent of airbrush maintenance and it takes minutes rather than the half hour people dread. Keep a large bottle of cleaner where you can reach it without getting up. Read next: our airbrush cleaner guide and the airbrush cleaning kit review.