Last updated: August 23, 2026
Home built booths are one of the most satisfying projects in this hobby, because the requirement is simple, the materials are cheap, and you can size the thing around the models you actually build instead of around what a factory decided would ship flat. A storage tote, a filter, a fan and a length of duct is genuinely most of it.
There is one decision in the build that is not a matter of taste, and it is the fan. Everything else you can get wrong and fix later. Get the fan wrong while spraying solvent based paint and the failure mode is not a poor finish. This guide covers the build and is explicit about where that line sits.
This article contains affiliate links. If you buy through them, we may earn a commission at no extra cost to you. Learn more.
Quick Answer
How do you build an airbrush spray booth safely?
- Box, filter, fan, duct to a window. That is the whole design and the order matters.
- Put the filter between the model and the fan, so paint never reaches the motor.
- Solvent based paint changes the fan requirement. Read the safety data sheet for what you spray.
- Size the opening around your largest model plus your hand, then build the box around that.
Bottom line: build it for the paint you actually use, and let the manufacturer’s safety data sheet decide the fan question rather than a forum thread.
The Basic Design
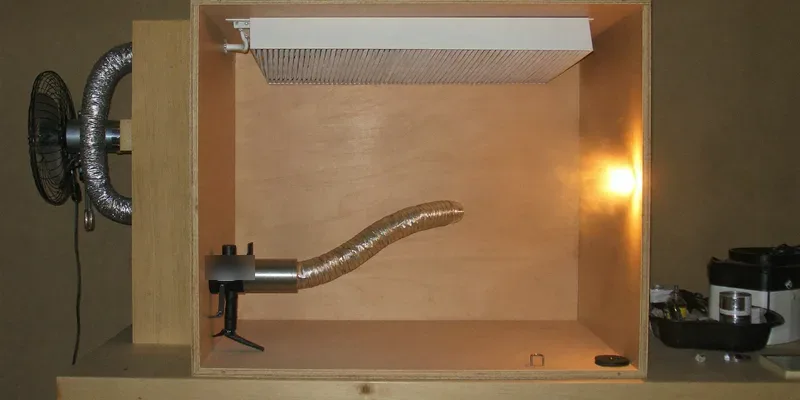
Air enters at the open front where you are spraying, crosses the model, passes through a filter, reaches the fan, and leaves through a duct to the outside. Five stages, in that order. Every good home built booth is this diagram in some material, and every bad one has the stages in the wrong sequence.
The most common build is a plastic storage tote laid on its side, a furnace filter cut to fit across the back, and a duct fan mounted behind it feeding flexible ducting out of a window. Plywood versions are sturdier and heavier. Cardboard works as a prototype and should not be the final answer near anything that plugs in.
Filter Before Fan, Always
If the fan sits in front of the filter, paint mist lands on the blades and inside the motor housing. It builds up, it unbalances the impeller, and it deposits combustible residue exactly where the electrical parts are. Putting the filter first is the difference between a fan that lasts and a fan that becomes a problem.
The Fan Decision, and Where the Line Is
For water based acrylics an ordinary inline duct fan or a squirrel cage blower is the usual hobby build, mounted behind the filter and ducted outside. That is what most tutorials show and it is a reasonable arrangement for the paints most miniature painters use.
Solvent based paints and thinners are a different question and the manufacturer’s safety data sheet is where the answer lives. Tamiya’s safety data sheet for its lacquer paint thinner classifies it as a highly flammable liquid and vapor, carries the precautionary statement to use explosion proof electrical equipment, ventilation and lighting systems, and instructs users to keep it away from heat, hot surfaces, sparks and open flames. An ordinary duct fan is not explosion proof equipment and does not become so by being behind a filter.
What That Means in Practice
If you spray lacquers, do not treat a home built box with a hardware store fan as the solution. Follow the handling instructions on the sheet for that specific product, which for the Tamiya thinner means outdoors or a well ventilated area with ignition sources kept away. Many modelers do their lacquer work outside or on a balcony for exactly this reason, and keep the indoor booth for acrylics.
Choosing the Filter
A pleated furnace filter cut to the width of the box is the standard choice, and it works because it presents a large surface area so the fan is not fighting resistance. Flat fiberglass pads are cheaper and load faster. Whichever you use, the filter is a consumable and the build should let you swap it in seconds.
A cheap pre filter in front of the main one is worth the extra minute of building. It catches the bulk of the mist, costs very little, and multiplies the life of the filter behind it. If you spray a lot of primer this is the single best change you can make to a home built booth.

Sizing and Ducting
Build the opening around your largest model plus the hand holding the brush plus room to rotate, then make the box deep enough that the model sits fully inside the airflow. Depth is what home built booths get right and commercial folding ones cannot, so use the advantage.
For the duct, short and straight beats long and kinked every time. Each bend costs airflow, and flexible ducting that sags into a U traps condensation and paint. Run it as directly as you can to a window panel, and make the panel removable so the window still closes when you are not painting.
| Part | Common choice | Why | Mistake to avoid |
|---|---|---|---|
| Box | Plastic tote or plywood | Cheap, sized to your models | Cardboard as a permanent build |
| Filter | Pleated furnace filter cut to width | Large area, low resistance | Fitting it behind the fan |
| Fan | Inline duct fan or blower | Matched to a small opening | Using it with solvent paint, see the SDS |
| Duct | Short flexible run to a window panel | Fewer bends, more airflow | Long sagging runs with a low point |

Lighting and the Finishing Touches
Light the inside, not the room. A strip of LED tape along the top edge and down the front corners gives even light on the model without shadows from your own hand, and it draws almost nothing. Keep the wiring outside the box rather than in the air path, and away from the filter.
A turntable, even a cheap one, changes how the booth feels to use, because it means you rotate the model rather than reaching around it. Line the floor of the box with foil or baking paper so cleanup is lifting a sheet out. And put a hook or a clamp on the side for the airbrush, since the alternative is laying it down inside the booth where it will leak.

Frequently Asked Questions
Can I use a bathroom extractor fan for a spray booth? For water based acrylics with the filter in front of it, many hobby builds do exactly that. For solvent based paint, follow the safety data sheet for the product instead of a general rule. Tamiya’s lacquer thinner sheet calls for explosion proof ventilation equipment and for keeping ignition sources away.
Do I have to vent outside? If you can, yes. A booth that recirculates has filtered the visible mist and returned the air to the room, which still keeps overspray off your shelves but does nothing else. Our page on airbrush ventilation explains what that distinction means indoors.
What size fan do I need? Match it to the opening rather than buying the biggest one. A small mouth with a large fan mostly pulls room air in around the edges. A four inch inline fan behind a filter is a common and workable pairing for a tote sized booth.
Is a cardboard box good enough? As a first attempt to see whether the layout works, yes. As a permanent booth with a mains fan and paint residue accumulating in it, no. Move to a plastic tote or plywood once you know the size you want.
Is building one actually cheaper than buying? Sometimes, and that is not usually the reason to do it. Home builds win on depth and on fitting a specific bench, which is what the commercial folding units cannot offer. If a tabletop unit fits your models, buying is less work. Our spray booth guide covers those.
The Bottom Line
Box, filter, fan, duct, window, in that order, sized around your largest model rather than around a flat pack. Keep the filter between the paint and the motor, keep the duct short, and light the inside. The one thing not to improvise is the fan when solvent based paint is involved, because the manufacturer’s safety data sheet asks for explosion proof ventilation equipment and a hardware store fan is not that. Read next: where the mist actually goes and what a respirator adds.